Transients in Second Order Reactive Systems
Purpose
To become familiar with the transient behavior of a simple RLC circuit.
The behavior of systems as an external energy source changes from one state to another is important not only in electric circuits, but also in other systems. The time taken to reach steady state under the new conditions, the changes (sometimes oscillatory) that the variables in the system go through in this process, the peak excursions of variable and the stability of the system are of concern. The period when the circuit goes from one steady state to another is the transient period of the system and understanding this phenomenon is the object of this experiment.
Pre-Lab
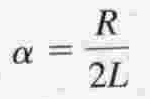
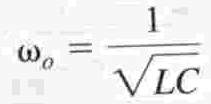
For the series RLC circuit labeled Circuit
1 the characteristic equation is
![]()
With a Damping Coefficient (in rad/s) and Resonant Frequency of:
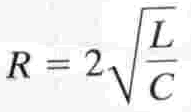
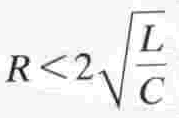
The circuit is considered Critically Damped when:
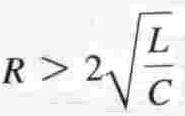
and Overdamped and Underdamped if respectively:
Equipment
Proto Board
Short pieces of wire
Resistors (three determined
in the prelab)
Capacitor (one - 0.01µF)
Inductor (one - 25mH)
Multimeter
Function Generator
Oscilloscope
Procedure
Transients in RLC Circuits
1. Construct the RLC circuit as shown in Circuit
1. Apply a
2Vpp (2V peak to peak) 1kHz square wave. Use the closest standard value resistor
for RCritical that you calculated in Section 1 of the PreLab.
Note: Remember, a square wave can be considered as a repetitive step voltage that will
enable you to obtain a steady display on the oscilloscope..
2. Using the oscilloscope, observe the applied voltage on Channel 1 and the voltage across the capacitor C on Channel 2. Carefully sketch the superimposed waveforms showing the horizontal and vertical scales (voltage and time per division) and the number of divisions.
3. Measure the Rise Time of the step response. Indicate the rise time of the voltage on the sketch for Section 2 above. Show me how.
4. Change R to the closest standard value for 4RCritical that you calculated in Section 2 of the Pre-Lab. Change the Function Generator to 400 Hz and carefully sketch the superimposed waveforms. Measure the rise time and indicate it on the sketch. Show me how
5. Change R to the closest standard value for (1/4)RCritical that you calculated in Section 3 of the Pre-Lab. Change the Function Generator back to 1 kHz and carefully sketch the superimposed waveforms. Measure the rise time and indicate it on the sketch. Show me how
6. Replace R with a short circuit. Record the period of the first cycle of the ringing that occurs. To make the most accurate measurement:
7. Calculate the frequency of the ringing. The frequency in hertz or cycles/second is 1/period in seconds/cycle.
Analysis
1. Carefully sketch the observed waveforms and indicate the horizontal and
vertical scales for parts 2, 4 and 5.
2. Compare the responses obtained with what was expected. Discuss what each response represents.
3. Compare the frequency of the ringing (Section 7 of the Procedure) with the resonant frequency calculated in Section 5 of the Pre-Lab. Why was R set to 0Ω for this measurement?
4. Measure the Rise Times of the simulated PSpice responses (done in Section 4 of the Pre-Lab) and compare them to those measured in Sections 3, 4 and 5 of the Procedure.
5. Compare and comment on the rise times noted in parts 3, 4 and 5 of the Procedure.